

How To Repair The Eubber Aroind My P3 12
Oops! Speakers can get blown for various reasons (amplifier clipping, too much volume, as well much fourth dimension at loftier intensity). Disappointing as it is, low quality speakers or a number of factors can atomic number 82 to blown speakers? After spending so much fourth dimension finding and putting a speaker in, you might experience cheated from its brusque life span.
To fix your blown subwoofer yous'll need to take it out of your machine, set up or replace whatsoever damaged parts, and mucilage/wire information technology dorsum together. This process tin can range from easy to very hard, depending on the problem.
Earlier making a decision to repare a blown subwoofer, figure out how damaged your speaker is, how long it should take to fix, and if it's easier or makes more sense to get a new i. Allow detect out if it makes sense for yous to make an attempt to gear up a blown subwoofer. The following information can aid you lot decide.
How To Fix A Blown Subwoofer Like An Practiced?
Subwoofer Basics
Subwoofer tin come in various diameters and depths. A subwoofer is designed to create better bass by reproducing the low-frequency sound of your music; in curt, this is the element which adds the Blast to music and help you feel it.
For the music lovers, the subwoofers aids in the music experiencing and creating an entirely dissimilar atmosphere when information technology is played. Your subwoofers can usually exist one of two types: Powered or Passive.
- Powered subwoofers operate using the car's receiver for power. The stereo receiver can power some subwoofers just fine, for good quality sound.
- Passive subwoofers draw ability from an external amplifier. These subwoofers need an external amplifier to produce sounds as the were meant to exist heard.
When the subwoofer draws power, it tin can get damaged if it is under or overpowered. Each subwoofer can handle a certain amount of power, only if the power is past it'southward handling capacity of the cone, information technology could tear the cone, the suspension material (rubber/foam), andthe spider.
Why Did My Subwoofer Go Blown
The fact that the subwoofer gets damaged means the power is too bang-upor likewise little.Usually the subwoofer can handle what it is rated for, but better construction allows for more mistakes, pregnant the speaker can last longer.
Over powering a speaker can harm the voice coil, making it move too far, crashing it into the plate or yoke of the speaker. The voice coil tends to become separated from the spider, the cone, and might damage the roll itself. It may no longer create sounds if it is tore. You might hear a buzzing sound when music is existence played. That'southward one indictation that the subwoofer is diddled.
Under powering a speaker can damage the speaker by overheating it, tearing it from irregular signals, and jamming the voice ringlet so it gets stuck. Check that your amplifier has plenty of power to give to the woofer, and so signals are articulate. If you hear a distorted signal/sounddon't plough it upwardly.
An amplifier rated for you speakers' RMS is best. Too piffling power or also much can cause damage.
Steps to Bank check the Blown Subwoofer
First, a couple checks should be washed to diagnose the bodily trouble of why the speaker in not working. In one case I had a speaker that stopped working. The voice gyre was jabbed. I ended up getting the vocalism coil dorsum in identify and it worked once again. This was a quick set.
A blown subwoofers may have some tearing or vocalism coil issues. These are more difficult problems because of ii reasons:
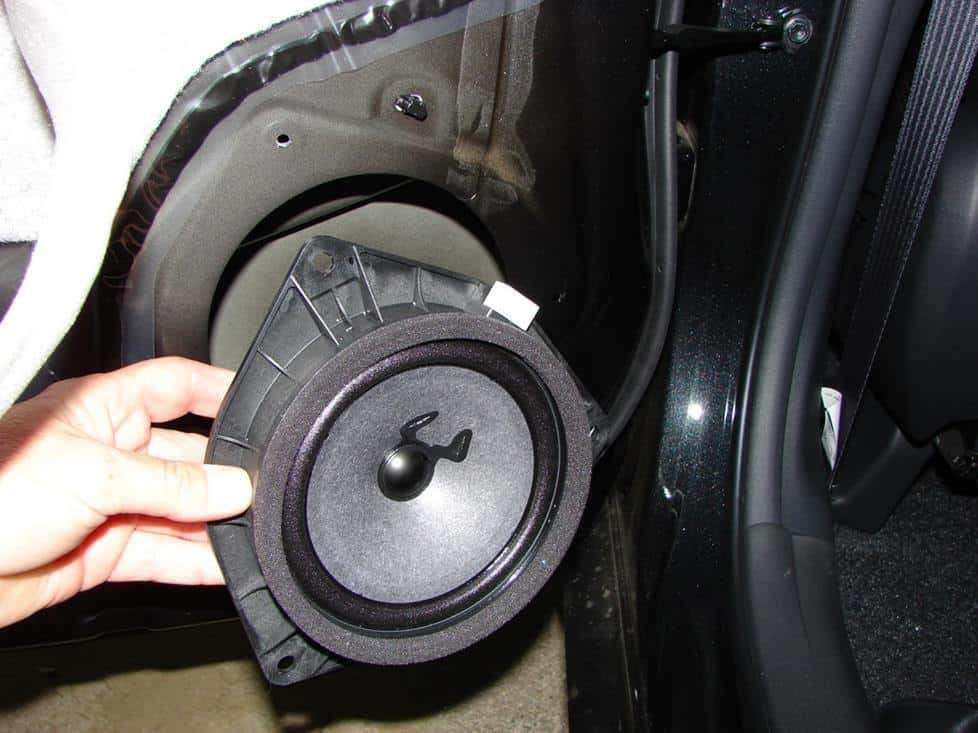
Photo Credit: https://innovatecar.com/tips-gear up-diddled-subwoofer/
1. Blown Coil:
The voice coil is the component that has current running through it, to help it pull and push button against the speaker magnet. Information technology moves the speaker cone up and downwards to produce sound.
If your not sure the whorl is damaged, connect the terminals of the coil to a multimeter, and if there is no resistance detected, it could be because the coil is damaged.
2. Damaged Speaker Cone:
If there are no issues with the scroll, the side by side possibility could be a damaged speaker cone, which is usually is easy to detected. Since the subwoofer is built on a suspension system, the cone is easy to move and tear at times. Look for the following signs to so if your speaker cone is damaged:
- Gently remove the cover for your subwoofer and check for the motility of the cone by gently pushing forth the sides
- If the cone is rigid and does non move, this could mean the voice coil is jammed or broken. Check carefully for small rips or holes. You might demand lighting, but eventually you'll notice a rip in the cone or foam intermission.
If their is a tear in the subwoofer cone or foam, the next step volition be deciding on whether to ready it.
A cream replacement should take about 30 minutes and part are readily available.
A cone replacement kit will take longer and cost, sometimes as much as the speaker. The Cone, spider, and voice roll will all need to be supplant if any of i of them are broken. This might take virtually 2-iii hours if post-obit clear instructions.
Another cheap option is to employ materials institute at home. This could work fine in some situations, if you don't listen some imperfections.
The following are step you tin can follow to repair diverse problems with you speaker. Follow these steps for DIY speaker repair.
Steps to exist Followed
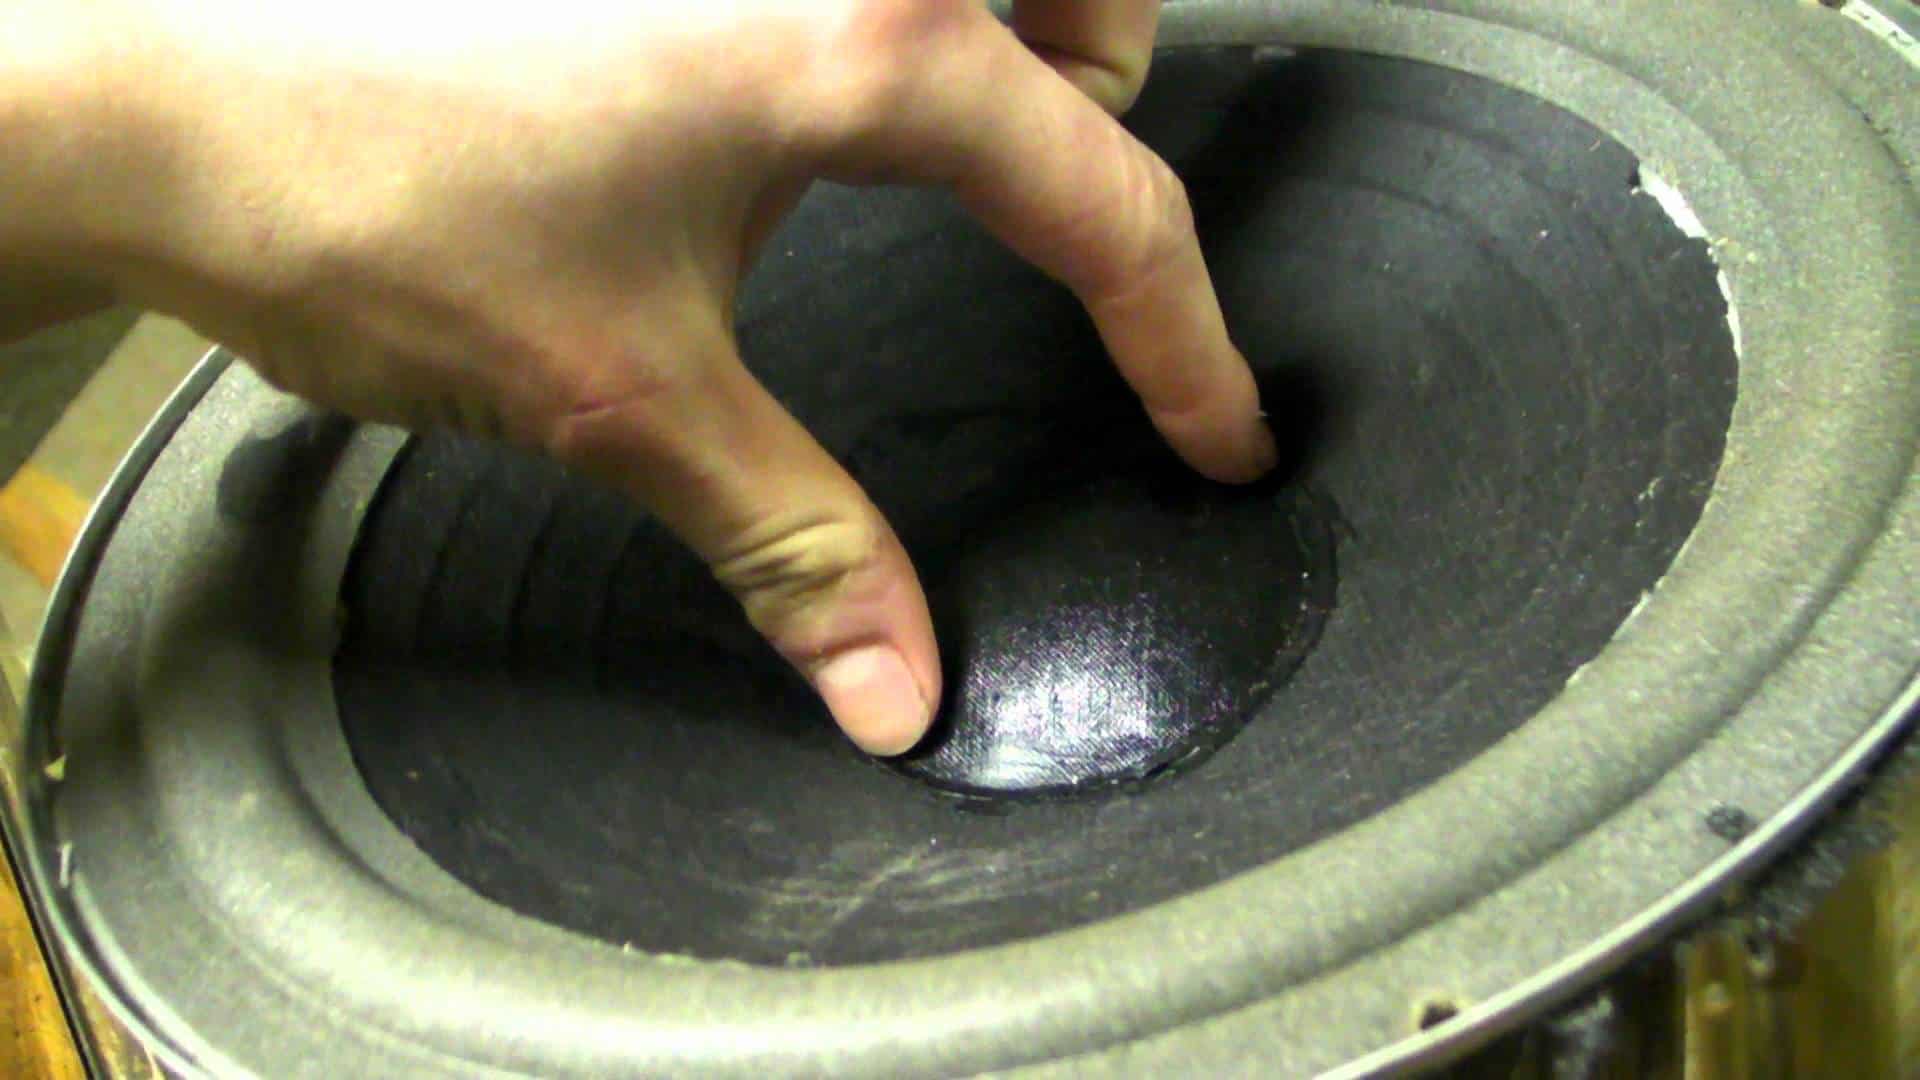
Photo Credit: https://www.youtube.com/watch?v=zQ7v9waJmT8
one. Detaching the speakers:
Employ a screwdriver to take the speakers from the place where it is mounted and take off the attached wires. After that, find a clean place to work that has plenty of lighting.
Your task at this point is to check the speaker and see what the problem is. Is the cream suspension damaged, the cone, or the voice whorl?
You lot'll need to social club your parts. For the foam suspension and glue endeavour Amazon.com. For the speaker cone and whorl endeavor simply speakers.
2. Learn About How to Prepare Your Speaker:
How to supplant the foam surround.
How to supercede everything: the foam, cone, spider, and coil.
How to repair a scissure or small-scale pigsty using simple process.
Tools and parts you might need: Don't forget a screwdriver also. If your getting a kit some items may be included.
| Hobby Pocketknife Set | Speaker Repair Glue | Rubbing Alcohol | Masking Tape | Elmer'south Glue | Epoxy |
|---|---|---|---|---|---|
| | | | | | |


iii. Simple Fixes: Stuck Coil and DIY Tear Repair
STUCK Curl
Press on the speaker cone gently and encounter it moves. If not, go a flashlight and take a look to meet of the voice scroll is out of place. If the voice curl is pushed up simply the wires are still good, you lot tin effort gently moving it back into position.
Endeavour pushing the speaker upwards on both sides, but not too high, and allowing the curl to readjust itself. If you tin can do this without damaging anything, and then examination the speaker out before reinstalling. It may work fine or there may be some unseen impairment that prevents the speaker from working.
TEAR REPAIR
One style to fix a tear is with glue and a paper towel. Not a perfect fix only an easy 1. Accept the newspaper towel and if information technology is two ply, remove one layer. Rip the newspaper towel to fit the size of your tear. The newspaper towel should be wide enough to encompass the rip just not overly wide.
Take Elmer'southward gum and spread it over the paper towel patch to go over the rip. The mucilage should saturate the paper towel, just not be runny. Use the glued paper towel patch to the speaker gently pressing and smoothing it into the speaker using a tool such equally a non serrated butter knife. Repeat this process for the back of the speaker.
Look for it to dry and and so use black matte spray paint if desires. This procedure can help the fiber of the torn speaker to lock together again with the glue and paper towel.
(Credit: These steps are taken from- this video )
4. Replace the foam surround:
Cut the foam if needed and employ a hobby knife the remove the gasket. Place the knife between the speaker frame and the gasket, and slide it to split up the gasket from the frame. Go all the way around so it tin be removed in one piece and used again. Make clean the glued surface area on the gasket by scraping with a utility/hobby pocketknife.
Utilise a hobby knife to carefully cut abroad the cream from the speaker. Employ the knife scrape the speaker frame wear the cream sat, so there are no more particles. Use rubbing alcohol on a paper towel and apply it to the expanse where the cream is fastened to the speaker.
Wait a infinitesimal and rub the foam with newspaper towel to remove some of the foam. Then use the hobby knife to carefully scrape off the remaining foam.
Then you can use the glue and new foam surround and apply glue to the inside lip of the foam. After applied, use your finger to spread the glue onto the lip and plough foam over and apply it to the speaker.
This takes pushing the foam with a finger carefully all the way around the cone until the foam seats on the cone well. The gum may take a minute to be ready. Look 1 hour for glue to dry.
Side by side, use glue to the area where the gasket was seated on the frame, so you can press the outer lip of the foam onto it and go information technology ready to utilise to the frame. Push the foam into the gum all the way effectually and look a minute.
Then start to apply the cream to the frame and at the same time bank check to encounter if the cone is centered by pressing downwards gently on reverse sides and feeling if there is any rubbing of the voice roll. Center if needed and standing pushing the cream downwardly until it sits firmly on the frame. Expect 1 hour for glue to dry.
Now your prepare to apply the gasket. Check where the holes of the speaker frame are and align the gasket to those holes. Use glue to the top edge of the foam and so place the gasket on height of the mucilage. Press downward on the gasket for a minute and plow the speaker over and let it dry for an 60 minutes.
Replace the speaker in the car. (At each footstep afterwards gluing, you can double check to brand sure everything glued correctly and was centered properly before going to the side by side pace.)
(Credit: These steps are taken from- this video )
5. Replace the Speaker Cone and Coil:
Additional Tools that you may need to complete the job. If your getting a kit some items may be included.
| Soldering Iron | Flash Lite | Wire Cutters | Paint Brush | Black Rubberized Agglutinative | Speaker Tester |
|---|---|---|---|---|---|
| | | | | | |


You'll need to follow the same procedures to replace either the cone or roll because the cone is glued to the coil and spider. When replacing the speaker cone and gyre refer to step 4 and follow any procedures that may apply.
Make sure you order the correct parts. At that place are many steps to this process. Please refer to the video in step 2 for more information.
Cleaning
- Cut out speaker cone, past cut forth the cream environs and cutting around just higher up the dust encompass close to the last wires. A hobby/Ten-acto knife is helpful when cutting and cleaning.
- Remove the cone and cut the spider effectually the outer border and the lead wires. Note how tall the voice coils sit.
- Remove the voice coil and and any debris (use a vacuum if droppings got into the gap or a business carte du jour with tape on information technology, sticky side out) and use masking tape to cover where the gyre used to sit. This ensures that no droppings gets into the area where the vox ringlet needs to move up and down.
- Make clean the spider remnants off the frame using a knife, and remove the gasket as in step 4 so you can use information technology once again. Clean off any other leftover material on the frame.
- Utilise a soldiering iron to remove wires and solder from the speaker basket terminals.
- Remove the masking tape and inspect the coil gap area with a flashlight. Make clean if needed.
Installing New Parts
- Place the shim into the curlicue gap and position the the new phonation ringlet outside the shim so information technology lines up with the basket terminals. If the ringlet width of the new coil is taller place the coil a bit higher than information technology was previously. Fold curlicue leads over shim to lock in place.
- Place two pin holes in the cone where the atomic number 82 wire will go. Look at previous cone for reference.
- Apply a dewdrop of speaker gum to the speaker frame, where the exterior expanse of the spider used to sit. Ready the spider in identify effectually the coil and make sure the glue soaks into the outer rim of the spider and utilise a apartment dull tool to press downwards on the glued area. Wait an hour.
- Place a bead of epoxy along the inside edge of the spider, where the spider and the vocalism roll one-time meets (the erstwhile is what the voice coil is wound effectually). Spread the epoxy evenly with the tip of the epoxy or a dull tool.
- Apply speaker gum to the inside edge of the frame, where the gasket sat.
- Put the cone into place, lining up the holes you lot made previously with the voice coil terminals. Printing downwards on the cone carefully spreading your fingers over the surface for even pressure and move the cone back and forth slightly then information technology sits into the glue and epoxy.
- Place a dewdrop of epoxy where the speaker cone and coil quondam meet. Printing downwards on the area where the foam meets the mucilage with your dull tool or finger until it sits well.
- Identify the lead out wires from the voice curl apartment confronting the cone going toward the pin holes yous made. Cut the atomic number 82 wires so almost a 1/4" of them are showing.
- Remove the shim. Tin can the lead out wires and solder the ii atomic number 82 wires and thread the wires through the holes. Pull the wires so they lye flat on the speaker with no slack.
- Place a polyvinyl treatment on the textile surrounds if applicative. Utilize a bead all around the environs and use a smaller pigment castor to smooth it out over the entire surface of the environs.
- Use black adhesive and employ it over the coil lead wires.
- Then identify the cone dust cover on and hold it down a big enough object to apply steady weight to the dust embrace. Place a dewdrop of black agglutinative effectually the border of the dust cap where information technology meets the cone. Finish past placing adhesive over the lead wires. Let it dry out for an hour. Then remove weight.
- Place the lead wires into the basket terminals leaving slack for the speaker to motility up and down without whatever problems. Then solder the wires into the terminals. Cut off the excess wire.
- Use speaker gum and identify a bead of glue all effectually the expanse where yous volition place the gasket. Employ the gasket to the to the mucilage pressing firmly down to seat it onto the frame well. Plow the speaker over and let it dry for an hr. Finished!
The last step would be to exam the speaker after they've had some time to dry out (24 hours) before y'all place them back in the automobile. You tin apply a bespeak generator or connect it to the car stereo. If it works well, then your ready to install them in the car.
(Credit: These steps are taken from- this video )
half dozen. Reinstall the Speaker:
Connect the wires back up to the speaker. Use the screws that you took from the speaker when you lot removed it, and supplant the speaker in its housing. Place speaker cover back on.

Decision
While there are a lot of steps involved when fixing a speaker cone and vox gyre, you can do it with a little patience. Sometime the set up tin can be fairly easy, so decide if you want to spend the time fixing a speaker or have someone else do it.
Make certain it is worth it for the money you are paying and the time your putting in. If not, an easy choice would be to get a new speaker. I promise you lot tin detect a good option for you and if yous want to learn more about speaker reviews endeavor out these other articles.

How To Repair The Eubber Aroind My P3 12,
Source: https://drivinglife.net/how-to-fix-a-blown-subwoofer/
Posted by: wysockionger1961.blogspot.com
0 Response to "How To Repair The Eubber Aroind My P3 12"
Post a Comment